

You are a Weebly blogger and wish to use WordPress. You might end up losing your previous articles. But, don’t worry, you can transfer every article to your WordPress website. The best part is you can migrate your content without any help from a developer or coding expert. All you need is an importer tool. This article will provide you step by step guide to switching from Weebly to WordPress.
There is no doubt that WordPress is the best blogging platform. However, most bloggers as a beginner use another platform. They go with one of the several free hosted solutions such as Weebly as they saw an advertisement on how easily it creates a website. Months after they start their blogging journey, they find out about the importance and role of SEO, monetization, customization, etc. Then they realize that they made the wrong choice and begin to panic as they don’t wish their hard work to go in vain.
Don’t worry, you can quickly switch your articles from Weebly to WordPress without any knowledge of coding. All you need is to note steps to switch from Weebly to WordPress within minutes.
To start your premium WordPress blog, you must register a domain name and a web hosting account.
Although WordPress is free, you need a domain and a web hosting account for SEO & monetization purposes.
After setting up your domain and hosting, you need to install WordPress. Once you are done with installing, move to the next step.

Earlier, it was too tough for Weebly users to move their content to WordPress as there was a lack of easy to export data.
WordPress Importer is an online tool that can easily fix this issue. It imports and converts your previously saved articles into an exportable format. It won't change anything in your previous Weebly website. Hence, it is ideal and safe to use.
Visit the Importer site and provide your previous domain name information.
You will be asked to enter your basic details (name and email address) and to choose an export format.
You shouldn't change the default option, WXR format, unless you run into trouble later.
Next, you have to select whether you wish the export file to include pages. As most people will like to, the default option is set to ‘Yes.’ Again, you shouldn't change this unless you really don’t want to include those pages in your WordPress website.
Then, just tap on ‘Export my Web site.’ It will then get your Weebly content and convert it into an exportable file.
You will see a download button to export your Weebly file. You have to right-click and choose from the menu 'Save link as.'

As you have a WordPress compatible format of your previously saved articles, import it into WordPress.
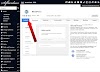
Login to the admin area and visit the Tools » Import page.
You will find a list of importers accessible for various platforms. You have to scroll down to WordPress and click on the 'Install Now' link.
WordPress will get and install the plugin on your WordPress website. Don't reload the page. Once it gets installed, you have to launch it by clicking on ‘Run Importer.'
You will be redirected to the WordPress Importer Page. Then, click on the ‘Choose file’ button to choose the export.XML file which you earlier downloaded.
Click on ‘Upload file and import.'

The tool will upload, export, and analyze the file. On the next screen, you have to import co-authors and media files. You can do so either through your previous website or by creating a new author or assigning articles to exist, WordPress users.
Check the box beside ‘Download and import files.' It will get pictures from your previous website to your media library.
Then, remember to click Submit to run importer. WordPress will then import content from an export file into the WordPress database. It gets pictures connected to your previous blog posts and pages.
You will get a success message after it's done.
You have successfully imported your previously saved content into your WordPress Website. Headings to posts, pages, and categories in your WordPress website to check if your content is there or not. Visit the media library to check imported pictures from your previous website.
In case, import process fails, you should run it again. Unlike another plugin, this one can easily find duplicate contents and skip those contents. It imports those contents that weren't imported in an earlier attempt.
In case, you were using a custom domain on your previous website, then make sure you have pointed it out in your WordPress hosting provider.
You have to log in and visit your Weebly account and Domains page. Edit the domain name and click on the change button on the domain settings page just after the nameservers option.
In the next screen, change or edit the WordPress host’s nameservers.
Save the settings.
Nameserver changes might take some time to show these changes.
However, if you were using a subdomain on your previous website, then follow the given steps to set up a redirect.
Visit Weebly > edit settings > SEO tab.
Now, move to header code option and add after editing the following code:
<meta http-equiv="refresh" content="0;url=http://www.yourdomain.com/">
Remember to edit and put your WordPress website's domain name. Save and publish the changes.
Visit your previous website which will redirect you to your new WordPress website.

Your previous site has a different URL structure. Something like this:
For blog posts: http://yourdomain.com/blog/your-post-title/
For pages: http://yourdomain.com/page-title.html
However, in case, you were using a custom domain on your previous website, your visitors will see 404 errors when they visit to search for that domain.
Here are steps to redirect the visitors to the new website and blog post.
Head to Settings » Permalinks page. Now, add /blog/%postname% in the place next to 'custom structure.'

Save the changes to update your permalinks.
Then, add .html at the URLs end on WordPress pages.
And, head to the Pages plugin, install and activate Add Any Extension.
After activation, head to Settings, and then add an extension to your pages.
Enter .html in the plugin settings. Then, ‘Update Settings.'
Now head to the Settings » Permalinks page and save the changes to update your permalink structure.
There is no doubt that WordPress is the best blogging platform. However, most bloggers as a beginner use another platform. They go with one of the several free hosted solutions such as Weebly as they saw an advertisement on how easily it creates a website. Months after they start their blogging journey, they find out about the importance and role of SEO, monetization, customization, etc. Then they realize that they made the wrong choice and begin to panic as they don’t wish their hard work to go in vain.
Don’t worry, you can quickly switch your articles from Weebly to WordPress without any knowledge of coding. All you need is to note steps to switch from Weebly to WordPress within minutes.
Follow the steps mentioned below
Step 1. Getting Started
To start your premium WordPress blog, you must register a domain name and a web hosting account.
Although WordPress is free, you need a domain and a web hosting account for SEO & monetization purposes.
After setting up your domain and hosting, you need to install WordPress. Once you are done with installing, move to the next step.

Step 2. Export Weebly content to WordPress Website
Earlier, it was too tough for Weebly users to move their content to WordPress as there was a lack of easy to export data.
WordPress Importer is an online tool that can easily fix this issue. It imports and converts your previously saved articles into an exportable format. It won't change anything in your previous Weebly website. Hence, it is ideal and safe to use.
Visit the Importer site and provide your previous domain name information.
You will be asked to enter your basic details (name and email address) and to choose an export format.
You shouldn't change the default option, WXR format, unless you run into trouble later.
Next, you have to select whether you wish the export file to include pages. As most people will like to, the default option is set to ‘Yes.’ Again, you shouldn't change this unless you really don’t want to include those pages in your WordPress website.
Then, just tap on ‘Export my Web site.’ It will then get your Weebly content and convert it into an exportable file.
You will see a download button to export your Weebly file. You have to right-click and choose from the menu 'Save link as.'

Step 3. Import Weebly Content into WordPress
As you have a WordPress compatible format of your previously saved articles, import it into WordPress.
Login to the admin area and visit the Tools » Import page.
You will find a list of importers accessible for various platforms. You have to scroll down to WordPress and click on the 'Install Now' link.
WordPress will get and install the plugin on your WordPress website. Don't reload the page. Once it gets installed, you have to launch it by clicking on ‘Run Importer.'
You will be redirected to the WordPress Importer Page. Then, click on the ‘Choose file’ button to choose the export.XML file which you earlier downloaded.
Click on ‘Upload file and import.'

The tool will upload, export, and analyze the file. On the next screen, you have to import co-authors and media files. You can do so either through your previous website or by creating a new author or assigning articles to exist, WordPress users.
Check the box beside ‘Download and import files.' It will get pictures from your previous website to your media library.
Then, remember to click Submit to run importer. WordPress will then import content from an export file into the WordPress database. It gets pictures connected to your previous blog posts and pages.
You will get a success message after it's done.
You have successfully imported your previously saved content into your WordPress Website. Headings to posts, pages, and categories in your WordPress website to check if your content is there or not. Visit the media library to check imported pictures from your previous website.
In case, import process fails, you should run it again. Unlike another plugin, this one can easily find duplicate contents and skip those contents. It imports those contents that weren't imported in an earlier attempt.
Step 4. Setting up Redirects
In case, you were using a custom domain on your previous website, then make sure you have pointed it out in your WordPress hosting provider.
You have to log in and visit your Weebly account and Domains page. Edit the domain name and click on the change button on the domain settings page just after the nameservers option.
In the next screen, change or edit the WordPress host’s nameservers.
Save the settings.
Nameserver changes might take some time to show these changes.
However, if you were using a subdomain on your previous website, then follow the given steps to set up a redirect.
Visit Weebly > edit settings > SEO tab.
Now, move to header code option and add after editing the following code:
<meta http-equiv="refresh" content="0;url=http://www.yourdomain.com/">
Remember to edit and put your WordPress website's domain name. Save and publish the changes.
Visit your previous website which will redirect you to your new WordPress website.

Step 5. Setting up Permalinks
Your previous site has a different URL structure. Something like this:
For blog posts: http://yourdomain.com/blog/your-post-title/
For pages: http://yourdomain.com/page-title.html
However, in case, you were using a custom domain on your previous website, your visitors will see 404 errors when they visit to search for that domain.
Here are steps to redirect the visitors to the new website and blog post.
Head to Settings » Permalinks page. Now, add /blog/%postname% in the place next to 'custom structure.'

Save the changes to update your permalinks.
Then, add .html at the URLs end on WordPress pages.
And, head to the Pages plugin, install and activate Add Any Extension.
After activation, head to Settings, and then add an extension to your pages.
Enter .html in the plugin settings. Then, ‘Update Settings.'
Now head to the Settings » Permalinks page and save the changes to update your permalink structure.


0 Comments